|
Best Coaching Baseball Throwing Methods for your PlayersCoaching Baseball Throwing is one of the cornerstones to the foundation of a solid baseball player. These throwing drills are designed to: * Provide you, the coach, an easy to use set of practice drills to improve your players throwing abilities. * Reinforce the proper throwing mechanics * Build your players muscle memory in the proper throwing motions * Improve velocity and accuracy of the throw * Reduce injury risk to players throwing arm The throwing fundamentals we covered in our baseball fundamentals sections will be reinforced here by you, the coach, in leading the following drills during your practices and games:
Throwing Drill #1 - Warm-up DrillCoaching baseball throwing starts with this drill. Coaches use this drill to teach players the proper throwing mechanics and build their muscle memory. Once your players understand and consistently utilize the proper mechanics, this drill is outstanding for continuous reinforcement as a practice and pre-game throwing warm-up routine.
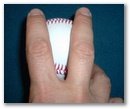
* A more accurate throw. The ball is less likely to tail off target. * Getting the ball from thrower to receiver more quickly. It takes a more direct route to target, thus arriving there more quickly. Explain this grip and have your players practice holding the baseball this way.
4-seam grip
Step 2: Have your players each pair up with a partner. Partners should face one another about 10 feet apart (this can vary slightly based on age and skill-set). Here's and example of how this might look: X <==10ft==> X (X's facing each other)
Step 3: The flick (This is the last 10% of the throwing motion you're using in this coaching baseball throwing technique) - Using the 4-seam grip, position your throwing arm elbow above your shoulder in front of your body and rest it on your glove hand (see diagram #1). Simply move your forearm forward, flicking your wrist thus releasing the ball with backspin to your target. Your target in this exercise is another person. Therefore your goal is to hit the middle of their chest. (Naturally, their goal is to catch it!)
Diagram #1
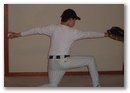
Step 4: Upper body Movement (each partner moves back 1 or 2 steps before this phase of the drill, depending on skill-set) About 10 throws for each partner, unless inaccurate. - Place your throwing arm side knee on the ground. Bend you glove side leg to a 90 degree angle. Your should and upper body should face your target square (diagram #2). Bring your glove (with ball in it) and throwing hand (in glove gripping 4-seam) back to your throwing side as your glove side should begins to align to your target. As you approach your throwing side shoulder, your throwing hand (with ball in it gripping 4-seam) and glove should begin to separate. This motion should continue as you reach away from the target with your throwing hand (don’t forget 4-seam grip with fingers on top and thumb on bottom) and glove moving toward your target (diagram #3). As your throwing hand moves forward, your glove-side shoulder will begin to move away from the target as your shoulders square with the target.
Diagram #3 
Diagram #2
- Standing across from each other (slightly further apart than the kneeling phase) each partner should perform the same upper body motion as in step 4. However, this time keeping your feet square (do not move them). Again, your target is your partners chest. See Diagrams #4 and #5 to illustrate this position. Again, about 10 throws each. If inaccurate, more than 10 may be necessary.
Diagram #5

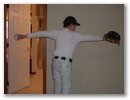
Diagram #4
- Face your partner with your shoulders square to the target. Turn your upper and lower body at the same time. In simple terms, this can be thought of as playing catch (assuming you have a partner). However, it’s the best way to practice the proper throwing motion. Eventually, these movements will occur naturally, as your muscle memory will take over after many repetitions and practice sessions. Please see diagrams #6 and #7.
Diagram #7 

Diagram #6
Only players that have mastered then previous 6 steps should participate in this phase. - Utilize Step 6 process here. However, the distance should be increased to match the players skill. Start just a couple steps back each. As accuracy improves, continue to stretch the distance. - This final step is designed to not only improve the players accuracy and technique at long disctances, it will also strengthen the players throwing arm as part of a regular warm-up routine. Note - This is not a contest of who can throw the ball fastest at the lowest trajectory. It's about building strength and accuracy using the muscle memory practiced in steps 1 - 6. Congratulations on mastering coaching baseball throwing. Return to Youth-Baseball-Made-Easy Home Page
|