|
Player Pitching Leagues - Fundamentals of Pitching InstructionThere are 2 pitching methods used in player pitching leagues we will discuss in this section: 1. The Full Wind-up 2. The Stretch
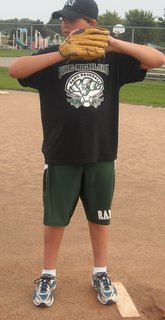
The Full Wind-up - Player Pitching LeaguesIn Player Pitching Leagues, pitching instruction of the full wind-up method should only be used when there are no runners on base or there is a no stealing rule (or stealing cannot occur until the ball passes the plate). If base runners are allowed to steal at will, this method will make it easier for the base runner to steal as it takes more time to complete than the stretch. You are unable to make a pick-off move from this method as well. Step 1: The Ready Position The pitcher stands on top of the rubber with both feet perpendicular on top of the rubber. Glove should be about chin high with the back of the glove facing the catcher (who is behind home plate). The throwing hand should be inside the glove holding the ball (see diagrams #1 & #2). If pitches are being called, this is the position to take the signs. If not, the pitcher should grip the ball with a 4-seem grip (see diagram #3).
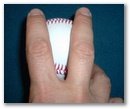
Diagram #3 -------->
From the ready position, the pitcher takes a small step back with their glove side foot (right handed uses left foot - left handed uses right foot). Step should be small and at about a 45 degree angle. However, some pitchers exaggerate this step more to the side which is an acceptable option. At this time, most of the weight should be shifted to this foot. See diagram #4. Diagram #4
Your plant foot is your throwing arm side foot (right foot for right handed pitchers and left foot for left handed pitchers). Simply pick your plant foot off the rubber and turn it to be parallel with the rubber. Place it parallel in front of the rubber (ensure the back side of your foot is touching the front of the rubber - see Diagram #5). Placing your foot in this manner will provide more driving leverage and allow more power to your pitch. NOTE: A common mistake I see often is pitchers placing their plant foot on top of the rubber. This will minimize your driving power, thus reducing your velocity, and possibly cause you to slip. Diagram #5
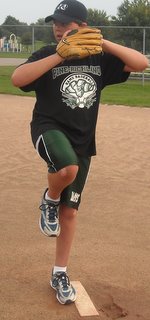
Shift your weight to your plant foot as you lift your glove side leg forward and raise your glove side knee to a right angle parallel with the rubber. You'll be standing only on your plant foot here as seen in diagrams #6 and #7. Diagram #6 and Diagram #7
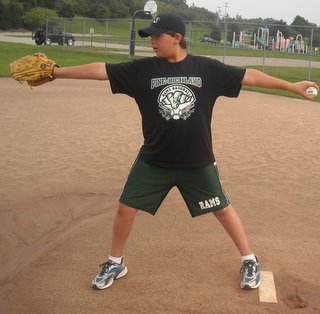
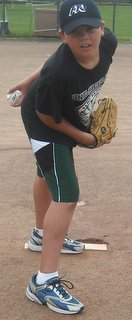
Step 5: The Drive As far as Player Pitching Leagues instruction is concerned, this is where much of your pitching power will come from. Your glove side leg moves toward home plate (using your plant foot to drive for more power). At the same time, your glove arm and throwing arm separate (glove arm toward home plate and throwing arm directly back toward 2nd base). Your throwing hand fingers should be thumb on the bottom and your index and middle finger on the top of the ball (see diagrams #8 & #9). Diagram #8 and Diagram #9
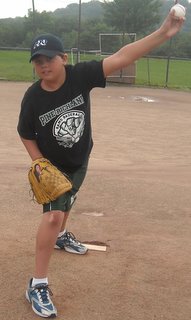
Step 6: The Release Yes, this is when you finally throw the ball to your catcher after all this pitching instruction!! However, let's discuss the proper technique to ensure maximum effectiveness with minimal injury risk. As you recall from the last step, only your head is looking forward to your target (the catcher). The remainder of your body is still in the perpendicular position as in diagrams #8 and #9 (above) until you begin this step. As your weight shifts forward to your front leg, your upper body and hips will turn to catch up with your head. Naturally, your throwing arm will follow as your thumb begins to turn and face your target as well. This movement will continue until all your weight has been transferred to your front leg and your throwing arm is in front of you releasing the ball to your target (see diagram #10). Diagram #10
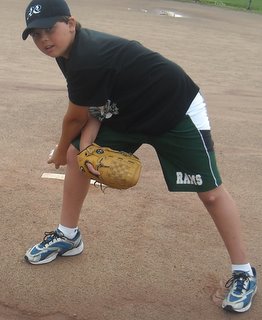
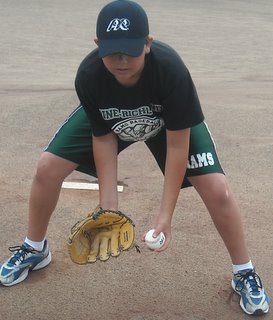
After the release of the ball, the follow-through is critical in maximizing accuracy, velocity, reduced injury risk and getting into proper defensive positioning. After all, once the ball leaves your hand, you become a defensive position player. All of your weight is on your front foot after releasing the ball. To properly follow-through, your back foot will lift off the rubber and rotate toward home plate following your throwing arm. Your back leg will move towards the plate actually passing your original front foot. As this is occurring, your throwing arm will move across your body and downward toward your original front foot (often referred to by coaches as touching the ground with your throwing hand as part of the follow-through). Once this motion is complete, your glove side leg should square up with your throwing arm side leg as well as your shoulders (see diagram #11). This ends your follow-through right into a proper defensive fielding position (see Diagram #12). Diagrams # 11
How do we, as a parent, keep up with the fast paced world of running our kid(s) around to sports and activities? One way I do it is exercise. How do I find the time? I use simple exercise routines that take only 20 minutes a day, 3 times a week.
Kettleworx
is one of the most popular ways to accomplish this. It's also one of the methods I've used to stay in (or get in) shape. Since our time is limited, these effective exercise sessions can make the most of what little spare time we have. Enabling us with more energy to keep up with our fast paced lives.
The Stretch - Player Pitching LeaguesIn Player Pitching Leagues, pitching instruction should explain the stretch can be used at anytime. While normal baseball thought sometimes dictates that the full wind-up is to be used with no base runners and the stretch is to be used with runners on base, there is no requirement to utilize the stretch in this way only. I recommend identifying the pitchers most comfortable delivery method of these two. If it is the stretch, this can be used anytime. If it is the full wind-up, it can only be effectively used when no runners are on base (or in player pitching leagues where stealing cannot occur until the ball passes the plate). You'll notice that in Player Pitching Leagues, once we get past the first two steps of the stretch, everything follows the full wind-up from the Balance step through follow-through with one deviation I'll explain. Let's review the steps of the Stretch:
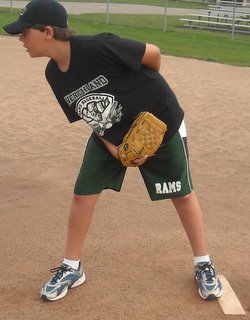
Your throwing arm foot should be parallel against the rubber. Your glove side foot should be extended toward home plate (1 - 2 feet past shoulder width) yet remain parallel with you plant foot (remember, your plant foot is your throwing hand foot that is against the rubber). Your shoulders should align with your feet causing your entire body to be perpendicular with the rubber (or in straight line with the rubber and home plate to think of it another way). Now that your feet, shoulders and body are in alignment, your glove should rest on your front leg knee as top of your body (waist up) slightly leans forward. Your throwing hand should rest on your back side hip with the ball in hand (some pitchers prefer to have the ball in the glove and the hand empty, this is ok, however the position of the body remains the same). Your head should look forward to receive the sign from the catcher and locate your target (see diagrams #1 and #2). This is the main difference in player pitching leagues that allow stealing and those that don't. Diagrams #1 and #2
Step 2: The Set Position In Player Pitching Leagues where base runners can lead and steal at anytime, this step is very important. We'll cover several functions of this step from the mechanics to holding runners closer to their base while leading. Moving from the Ready position (step 1) is quite easy. Simply bring your forward leg (glove side leg) back towards the rubber so that both your feet are about shoulder width apart. At the same time bring both hands together to meet in the middle of your chest (throwing hand on the baseball inside the glove) (see diagram #3). While in the set position, you have several responsibilities. First, grip the baseball inside the glove for the pitch you are about to throw (4-seam fastball, 2-seam fastball, change-up, etc). Additionally, if runners are on base, this is the position from which you will check you base runners lead and determine if a pick-off attempt is necessary or you are ready to deliver the pitch to the plate. (We'll address pick-off moves and balks in the Player Pitching Leagues advance section of this site). This is another difference between player pitching leagues that allow stealing and those that don't. Diagram #3
Just as the full wind up. Shift your weight to your plant foot as you lift your glove side leg forward and raise your glove side knee to a right angle parallel with the rubber. You'll be standing only on your plant foot here as seen in diagrams #4 ans #5. Diagrams #4 and #5
Same as from the full wind up. As far as Player Pitching Leagues instruction is concerned, this is where much of your pitching power will come from. Your glove side leg moves toward home plate (using your plant foot to drive for more power). At the same time, your glove arm and throwing arm separate (glove arm toward home plate and throwing arm directly back toward 2nd base). Your throwing hand fingers should be thumb on the bottom and your index and middle finger on the top of the ball. See diagrams #6 and #7. Diagrams #6 and #7
Step 5: The Release Again, mechanics same as full wind up at this point. Yes, this is when you finally throw the ball to your catcher after all this pitching instruction!! However, let's discuss the proper technique to ensure maximum effectiveness with minimal injury risk. As you recall from the last step, only your head is looking forward to your target (the catcher). The remainder of your body is still in the perpendicular position until you begin this step. As your weight shifts forward to your front leg, your upper body and hips will turn to catch up with your head. Naturally, your throwing arm will follow as your thumb begins to turn and face your target as well. This movement will continue until all your weight has been transferred to your front leg and your throwing arm is in front of you releasing the ball to your target (diagram #8). Diagram #8
After the release of the ball, the follow-through is critical in maximizing accuracy, velocity, reduced injury risk and getting into proper defensive positioning. After all, once the ball leaves your hand, you become a defensive position player. All of your weight is on your front foot after releasing the ball. To properly follow-through, your back foot will lift off the rubber and rotate toward home plate following your throwing arm. Your back leg will move towards the plate actually passing your original front foot. As this is occurring, your throwing arm will move across your body and downward toward your original front foot (often referred to by coaches as touching the ground with your throwing hand as part of the follow-through). Once this motion is complete, your glove side leg should square up with your throwing arm side leg as well as your shoulders (see diagram #9). This ends your follow-through right into a proper defensive fielding position (see diagram #10). Diagram #9
Return to the Home Page from Player Pitching Leagues
|